×
- Hello
- Login or Register
- Quick Links
- Live Chat
- Track Order
- Parts Availability
- RMA
- Help Center
- Contact Us
- Shop for
- Subaru Parts
- Subaru Accessories
My Garage
My Account
Cart
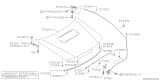
Genuine Subaru Forester Hood
Engine Hood- Select Vehicle by Model
- Select Vehicle by VIN
Select Vehicle by Model
orMake
Model
Year
Select Vehicle by VIN
For the most accurate results, select vehicle by your VIN (Vehicle Identification Number).
14 Hoods found


Subaru Forester Front Hood Panel
Part Number: 57229SG0009P$496.26 MSRP: $731.95You Save: $235.69 (33%)Ships in 1-3 Business Days


Subaru Forester Front Hood Panel
Part Number: 57229SJ0019P$449.07 MSRP: $662.35You Save: $213.28 (33%)Ships in 1-3 Business Days


Subaru Forester Front Hood Panel
Part Number: 57229SA0309P$532.32 MSRP: $785.13You Save: $252.81 (33%)Ships in 1-3 Business Days
Subaru Forester Front Hood Panel
Part Number: 57229SJ0009P$449.07 MSRP: $662.35You Save: $213.28 (33%)


Subaru Forester Front Hood Panel
Part Number: 57229SC0019P$405.64 MSRP: $598.28You Save: $192.64 (33%)Ships in 1-3 Business Days


Subaru Forester Front Hood Panel
Part Number: 57229SA0209P$532.13 MSRP: $784.85You Save: $252.72 (33%)Ships in 1-3 Business Days
Subaru Forester Front Hood Panel
Part Number: 57229SA0009P$369.71 MSRP: $545.30You Save: $175.59 (33%)Ships in 1-3 Business Days
Subaru Forester HOOD COMPL F
Part Number: 57229SL0009P$545.85 MSRP: $805.08You Save: $259.23 (33%)Ships in 1-2 Business Days
Subaru Forester Front Hood Panel
Part Number: 57220FC020$381.58 MSRP: $562.80You Save: $181.22 (33%)Ships in 1-3 Business Days
Subaru Forester Front Hood Panel
Part Number: 57229SC0009P$405.64 MSRP: $598.28You Save: $192.64 (33%)Ships in 1-3 Business DaysSubaru Forester Front Hood Panel
Part Number: 57229SC0119P$402.99 MSRP: $594.38You Save: $191.39 (33%)Ships in 1-3 Business DaysSubaru Forester Front Hood Panel
Part Number: 57229SC0109P$402.99 MSRP: $594.38You Save: $191.39 (33%)Ships in 1-3 Business Days


Subaru Forester Hood
Our website stands as the go-to online destination for OEM Subaru Forester Hood. With complete lines of genuine Subaru Forester Hood available at unbeatable market prices, we ensure top quality, reliability, and durability. Each part comes backed by the manufacturer's warranty, reinforcing your trust in our offerings.
Subaru Forester Hood Parts Questions & Experts Answers
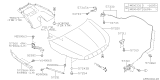
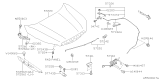
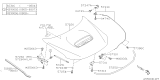
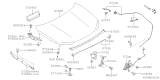
- Q: How to remove and install a hood, and what adjustments are necessary for proper alignment on Subaru Forester?A:The hood Is rather massive and removing/fitting it Is rather delicate, thus, the process should be accomplished by at least two persons. First, drop blankets or pads over the cowl area of the body and fenders as the hood is removed to avoid any scrathes on the paint. Retrace an outline around the lip of the hood hinge for accurate installation and remove any wires that would get in the way of its removal. With help, support the hood and unscrew the bolts that connects the hinge to the hood, and after that, lift the hood. To install, do the following in the opposite manner you performed the removal steps. To make alterations on the hood, one has to shift the hinge plate slot with the help of loosening bolts and nuts for lateral and longitudinal changes. Draw a line around the hinge plate to know the desired movement, next, slacken the bolts or nuts, adjust the hood to the correct orientation, and then ensure the position is correct by tightening the hinge bolts. Also tighten the hood striker as required where it closes and sits tightly with the fenders having put a round the striker mounting flange, loosening the bolts slightly and moving it as a marker for the required position. Finally, lo-torque the striker mounting bolts, and if required align the hood bumpers so that the hood could lie flat on the fenders when closed. This is the area where the Hood Latch assembly and hinges are located; make sure to greese these areas with lithuim base grease from time to time to ensure the parts do not stick due to rust and thus lead to binding and wear.


