×
- Hello
- Login or Register
- Quick Links
- Live Chat
- Track Order
- Parts Availability
- RMA
- Help Center
- Contact Us
- Shop for
- Subaru Parts
- Subaru Accessories
My Garage
My Account
Cart
Genuine Subaru Outback Hood
Engine Hood- Select Vehicle by Model
- Select Vehicle by VIN
Select Vehicle by Model
orMake
Model
Year
Select Vehicle by VIN
For the most accurate results, select vehicle by your VIN (Vehicle Identification Number).
17 Hoods found


Subaru Outback Front Hood Panel
Part Number: 57229AG06A9P$375.70 MSRP: $554.13You Save: $178.43 (33%)Ships in 1-3 Business Days


Subaru Outback Front Hood Panel
Part Number: 57229AL00C9P$379.80 MSRP: $560.18You Save: $180.38 (33%)Ships in 1-3 Business Days


Subaru Outback Front Hood Panel
Part Number: 57229AL00B9P$379.80 MSRP: $560.18You Save: $180.38 (33%)Ships in 1-3 Business Days


Subaru Outback Front Hood Panel
Part Number: 57229AG04A9P$375.70 MSRP: $554.13You Save: $178.43 (33%)Ships in 1-3 Business Days

Subaru Outback Front Hood Panel
Part Number: 57229AJ00A9P$325.12 MSRP: $479.53You Save: $154.41 (33%)Ships in 1-3 Business Days

Subaru Outback Front Hood Panel
Part Number: 57220AC020$346.80 MSRP: $511.50You Save: $164.70 (33%)Ships in 1-3 Business Days
Subaru Outback Front Hood Panel
Part Number: 57229AN00A9P$488.40 MSRP: $720.35You Save: $231.95 (33%)Ships in 1-3 Business Days
Subaru Outback Front Hood Panel
Part Number: 57229AG03A9P$375.70 MSRP: $554.13You Save: $178.43 (33%)Ships in 1-3 Business DaysSubaru Outback Front Hood Panel
Part Number: 57229AG07A9P$375.70 MSRP: $554.13You Save: $178.43 (33%)Ships in 1-3 Business DaysSubaru Outback Front Hood Panel
Part Number: 57229AJ01B9P$325.12 MSRP: $479.53You Save: $154.41 (33%)Ships in 1-3 Business Days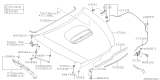
Subaru Outback Front Hood Panel
Part Number: 57229AJ01A9P$325.12 MSRP: $479.53You Save: $154.41 (33%)Ships in 1-3 Business DaysSubaru Outback Front Hood Panel
Part Number: 57220AC080$346.80 MSRP: $511.50You Save: $164.70 (33%)Ships in 1-3 Business DaysSubaru Outback Front Hood Panel
Part Number: 57229AG05A9P$375.70 MSRP: $554.13You Save: $178.43 (33%)Ships in 1-3 Business Days

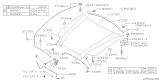

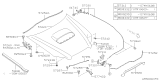
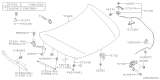
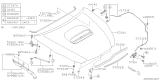
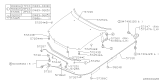
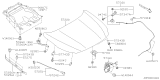
Subaru Outback Hood
Our website stands as the go-to online destination for OEM Subaru Outback Hood. With complete lines of genuine Subaru Outback Hood available at unbeatable market prices, we ensure top quality, reliability, and durability. Each part comes backed by the manufacturer's warranty, reinforcing your trust in our offerings.
Subaru Outback Hood Parts Questions & Experts Answers
- Q: How should the hood removal and installation procedure be performed on Subaru Outback?A:The hood is heavy and somewhat awkward to remove and install - at least two people should perform this procedure. Use blankets or pads to cover the cowl area of the body and Fenders to protect the body and paint as the hood is lifted off. Make marks or scribe a line around the hood hinge to ensure proper alignment during installation. Remove the plastic clip securing the insulator pad to the hood. Disconnect any wires that will interfere with removal. With an assistant helping you support the hood, remove the hood stay-to-hood bolts and place the stays down. With an assistant still helping you support the hood, remove the hinge-to-hood bolts. Lift off the hood. Installation is the reverse of removal. Fore-and-aft and side-to-side adjustment of the hood is done by moving the hinge plate slot after loosening the bolts or nuts. Scribe a line around the entire hinge plate so you can determine the amount of movement. Loosen the bolts or nuts and move the hood into correct alignment. Move it only a little at a time. Tighten the hinge bolts and carefully lower the hood to check the position. After installing the hood, adjust the hood release latch, if necessary. The latch can be adjusted fore-and-aft so that the hood closes securely and flush with the fenders. To make the adjustment, scribe a line or mark around the latch mounting flange to provide a reference point, then loosen the latch bolts and reposition the latch as necessary. Tighten the latch mounting bolts securely. Also, if necessary, adjust the hood bumpers so that the hood is flush with the fenders when it's closed. The Hood Latch assembly, as well as the hinges, should be periodically lubricated with lithium-base grease to prevent binding and wear.

Related Subaru Outback Parts
 Subaru Outback Hood Latch
 Subaru Outback Air Deflector
 Subaru Outback Hood Hinge
 Subaru Outback Grille