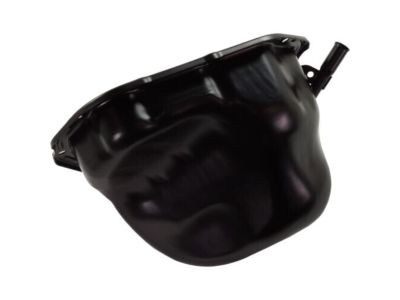
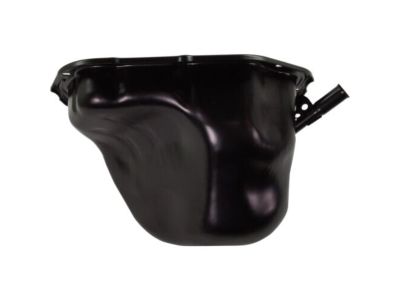
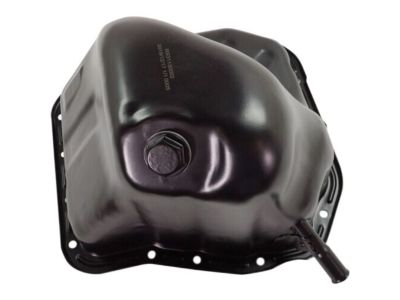
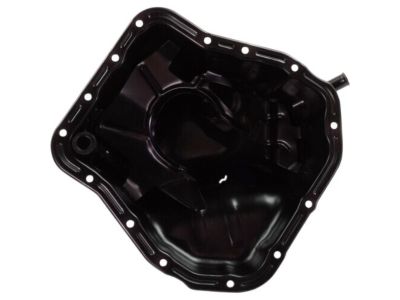
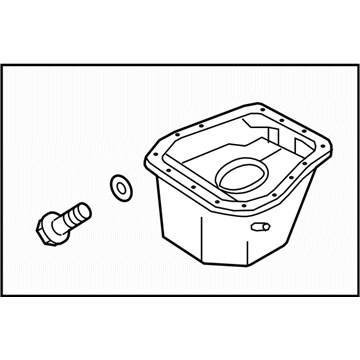
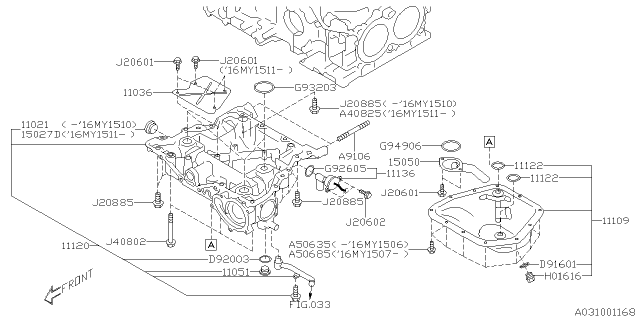
My Garage
Cart
Make sure this part fits

Subaru 11109AA151 Pan Assembly Oil

2006-2020 Subaru 11109AA151

Customer Questions & Expert Answers (5)
Subaru 11109AA151 Pan Assembly Oil
  • Part Description
    Oil Pan Assembly-Engine
  • Part Code
    11109
  • Replaces
    11109AA150
  • Manufacturer
    Subaru
Make sure this part fits
$96.09 MSRP: $139.27
You Save: $43.18 (31%)
Currently Unavailable

Due to manufacturer supply shortage, this item isn't currently available for ordering.

  • Related Parts
  • Product Specifications
  • Vehicle Fitment
  • Customer Questions & Expert Answers
  • Product Specifications

    BrandGenuine Subaru
    Part Code11109
    Manufacturer Part Number11109AA151
    Part DescriptionOil Pan Assembly-Engine
    Other NamesOil Pan
    Item Dimensions12.2 x 11.6 x 10.0 inches
    Item Weight3.80 Pounds
    ConditionNew
    Fitment TypeDirect Replacement
    Replaces11109AA150
    ManufacturerSubaru
    SKU11109AA151
    WarrantyThis genuine Subaru part is guaranteed by Subaru's factory warranty.
    Shipping & ReturnShipping Policy Return Policy
    Warning: California's Proposition 65
  • Vehicle Fitment

    Year Make Model Engine Important vehicle option details
    2006-2013 Subaru Forester2.5L H4, 2.5L H4 DOHC Turbo, 2.5L H4 SOHC, 2.5L H4 TurboForester Sports, L.L.Bean, X, X Limited, XS, XT, XT Limited
    2006-2011 Subaru Impreza2.5L H4, 2.5L H4 Turbo2.5 GT, 2.5i, 25i, Outback, Outback Sport, STI, STI Limited, STI Special Edition, STI Sport, WRX, WRX Sport, WRX TR, WRXSS
    2006-2014 Subaru Impreza STI2.5L H4, 2.5L H4 Turbo2.5 GT, 2.5i, 25i, Outback, Outback Sport, STI, STI Limited, STI Special Edition, STI Sport, WRX, WRX Sport, WRX TR, WRXSS
    2006-2014 Subaru Impreza WRX2.5L H4, 2.5L H4 Turbo2.5 GT, 2.5i, 25i, Outback, Outback Sport, STI, STI Limited, STI Special Edition, STI Sport, WRX, WRX Sport, WRX TR, WRXSS
    2006-2009 Subaru Legacy2.5L H4, 2.5L H4 Turbo2.5i, 2.5i Base, 2.5i Limited, Base, GT, GT Limited, XT Limited
    2006-2009 Subaru Outback2.5L H4, 2.5L H4 Turbo2.5i, 2.5i Base, 2.5i Limited, Base, GT, GT Limited, XT Limited
    2015-2020 Subaru WRX2.5L H4 TurboBase, Limited, Premium, S209, Type RA
    2015-2020 Subaru WRX STI2.5L H4 TurboBase, Limited, Premium, S209, Type RA
  • Customer Questions & Expert Answers

    Q:
    I am looking to confirm that this part is the exact replacement for my car Posted by SubaruPartsDeal Specialist
    A:
    You can Select Your Vehicle to check if 11109AA151 fits your vehicle.
    Posted by SubaruPartsDeal Specialist
    Q:
    How to remove and install an oil pan in a Subaru Forester? Posted by Customer
    A:
    Disconnect the cable from the negative terminal of the battery. Remove the air filter housing, intake ducts, and the resonator, noting that depending on the vehicle's year and model, the air filter housing may not need to be removed. For turbocharged models, remove the intercooler. Remove the engine support brace and the radiator support brackets. Raise the vehicle and support it securely on jack stands, then remove the front wheels and tires. Remove the engine splash shield, and for non-turbocharged models, remove the exhaust manifold, which is necessary for added clearance when raising the engine for oil pan access. Drain the engine oil and remove the oil filter, then remove the dipstick tube by locating the mounting bolt on the cylinder head, removing the bolt, and sliding the dipstick tube out of the lower housing on the oil pan. Connect an engine hoist to the engine, remove the nuts from the engine mounts at the frame, and raise the engine two inches with the hoist. Remove the bolts securing the oil pan to the engine, tapping on the pan with a soft-faced hammer to break the gasket seal, and lower the oil pan from the engine, using a thin putty knife if necessary to break the seal without damaging the aluminum block. If the oil pump pickup tube interferes with oil pan removal, remove the pickup tube bolts and take both the oil pan and pickup tube out of the vehicle. For installation, scrape out all traces of the old gasket from the engine block and oil pan, being careful not to damage the sealing surfaces. Clean the oil pan with solvent and dry it thoroughly, checking for distortion and straightening any warped areas. Install a new O-ring on the pickup tube and place it in the oil pan, then apply a thin coat of gasket sealant to the new oil pan gasket and position it carefully on the oil pan. Raise the oil pan into position, install the pickup tube without disturbing the gasket, and secure the oil pan to the engine block, tightening the bolts hand-tight and then to the specified torque, avoiding over-tightening to prevent oil leaks. Complete the installation by reversing the removal process, refilling with fresh oil, installing a new filter, starting the engine, and checking for oil leaks.
    Posted by SubaruPartsDeal Specialist
    Q:
    How to remove an oil pan on Subaru Impreza? Posted by Customer
    A:
    Before doing this task, you must first disconnect the negative terminal of a battery and remove the air filter housing, intake ducts and resonator. In certain instances, taking out the air filter housing is not required depending on car's model and year. The intercooler has to be removed in turbocharged models. After that, take off engine support brace, radiator support brackets followed by raising the vehicle securely with jack stands and removing front wheels and tires. Eliminate engine splash shield as well as on non-turbo models exhaust manifold for extra clearance when raising engine to get access to oil pan bolts. Prior to removal of the dipstick tube from the engine hoist connection and lifting it 2 inches up, drain engine oil then remove oil filter as well. Loose nuts from the frame at engine mounts before removing bolts securing oil pan to engine by tapping soft-faced hammer against the pan so as to break gasket seal while letting down oil pan from it. Be careful so that you do not apply force on an oil pan unless all screws are detached from it completely. Whenever discharging any oil pump pickup tube if this is interfering with its removal process, then you should detach them by extracting their related cap screws that secure them into place after which grab an entire assembly easily using your hands or fingers while pulling upwards away from lowermost part of a vehicle when necessary. Scrape any old traces of a gasket left over during installation off; clean surfaces of both O-ring of pickup tube and also those located inside an opened portion within a top flat surface area around edge where bolts go through together with groove; put new one onto that same position or area close enough until another begins just above upper edge adjacent towards openings beneath screws themselves respectively without squeezing too tightly after it has been placed rightly against hole opening entirely except establishing contact exactly there like other things had been done including inserting these fasteners into corresponding holes before finally tightening everything carefully since it is actually easier than otherwise. Apply some thin layer of gasket sealant onto brand new oil pan gasket now position carefully on top plate without making contact between both materials, raise oil pan into proper place then install pick tube followed by tightening its corresponding mounting screws loosely ensuring that none has been disturbed during these operations as well; make sure you don't tighten them too strongly either after they have been properly fitted. Bolt oil pan to engine block gradually starting from center towards ends with an avoidance of overtightening in order not to cause leakage of oil. Finally, complete installation process back up filling fresh fuel plus new filter, start car engine and also check for any signs indicating whether there is a leak or not.
    Posted by SubaruPartsDeal Specialist
    Q:
    How to remove and install an oil pan in a Subaru Legacy? Posted by Customer
    A:
    Disconnect the cable from the negative terminal of the battery. Remove the air filter housing, intake ducts, and the resonator, noting that depending on the vehicle's year and model, the air filter housing may not need to be removed. For turbocharged models, remove the intercooler. Remove the engine support brace and the radiator support brackets. Raise the vehicle and support it securely on jack stands, then remove the front wheels and tires. Remove the engine splash shield, and for non-turbocharged models, remove the exhaust manifold, which is necessary for added clearance when raising the engine for oil pan access. Drain the engine oil and remove the oil filter, then remove the dipstick tube by locating the mounting bolt on the cylinder head, removing the bolt, and sliding the dipstick tube out of the lower housing on the oil pan. Connect an engine hoist to the engine, remove the nuts from the engine mounts at the frame, and raise the engine two inches with the hoist. Remove the bolts securing the oil pan to the engine, tapping on the pan with a soft-faced hammer to break the gasket seal, and lower the oil pan from the engine, using a thin putty knife if necessary to break the seal without damaging the aluminum block. If the oil pump pickup tube interferes with oil pan removal, remove the pickup tube bolts and take both the oil pan and pickup tube out of the vehicle. For installation, scrape out all traces of the old gasket from the engine block and oil pan, being careful not to damage the sealing surfaces. Clean the oil pan with solvent and dry it thoroughly, checking for distortion and straightening any warped areas. Install a new O-ring on the pickup tube and place it in the oil pan, then apply a thin coat of gasket sealant to the new oil pan gasket and position it carefully on the oil pan. Raise the oil pan into position, install the pickup tube without disturbing the gasket, and secure the oil pan to the engine block, tightening the bolts hand-tight and then to the specified torque, avoiding over-tightening to prevent oil leaks. Complete the installation by reversing the removal process, refilling with fresh oil, installing a new filter, starting the engine, and checking for oil leaks.
    Posted by SubaruPartsDeal Specialist
    Q:
    How to remove an oil pan on Subaru Outback? Posted by Customer
    A:
    Before doing this task, you must first disconnect the negative terminal of a battery and remove the air filter housing, intake ducts and resonator. In certain instances, taking out the air filter housing is not required depending on car's model and year. The intercooler has to be removed in turbocharged models. After that, take off engine support brace, radiator support brackets followed by raising the vehicle securely with jack stands and removing front wheels and tires. Eliminate engine splash shield as well as on non-turbo models exhaust manifold for extra clearance when raising engine to get access to oil pan bolts. Prior to removal of the dipstick tube from the engine hoist connection and lifting it 2 inches up, drain engine oil then remove oil filter as well. Loose nuts from the frame at engine mounts before removing bolts securing oil pan to engine by tapping soft-faced hammer against the pan so as to break gasket seal while letting down oil pan from it. Be careful so that you do not apply force on an oil pan unless all screws are detached from it completely. Whenever discharging any oil pump pickup tube if this is interfering with its removal process, then you should detach them by extracting their related cap screws that secure them into place after which grab an entire assembly easily using your hands or fingers while pulling upwards away from lowermost part of a vehicle when necessary. Scrape any old traces of a gasket left over during installation off; clean surfaces of both O-ring of pickup tube and also those located inside an opened portion within a top flat surface area around edge where bolts go through together with groove; put new one onto that same position or area close enough until another begins just above upper edge adjacent towards openings beneath screws themselves respectively without squeezing too tightly after it has been placed rightly against hole opening entirely except establishing contact exactly there like other things had been done including inserting these fasteners into corresponding holes before finally tightening everything carefully since it is actually easier than otherwise. Apply some thin layer of gasket sealant onto brand new oil pan gasket now position carefully on top plate without making contact between both materials, raise oil pan into proper place then install pick tube followed by tightening its corresponding mounting screws loosely ensuring that none has been disturbed during these operations as well; make sure you don't tighten them too strongly either after they have been properly fitted. Bolt oil pan to engine block gradually starting from center towards ends with an avoidance of overtightening in order not to cause leakage of oil. Finally, complete installation process back up filling fresh fuel plus new filter, start car engine and also check for any signs indicating whether there is a leak or not.
    Posted by SubaruPartsDeal Specialist
    If you have any questions about this product, please don't hesitate to ask us. We will be happy to help you!

Genuine Subaru Part 11109AA151, the Right Choice

Genuine Subaru part # 11109AA151 Pan Assembly Oil is produced to provide reliable performance and durability. It can sometimes be called Oil Pan. Through legitimate dealers and by meeting Subaru's strict quality standards, it is backed by a 12-month/12,000-mile warranty and carries manufacturer certification. You can find unmatched technical support at SubaruPartsDeal.com. When you need our services, either regarding the payment methods or other problems with the platform, we are always ready to cooperate with you. This part fits 2006-2013 Forester, 2006-2011 Impreza, 2006-2009 Legacy, and 2006-2009 Outback.

SubaruPartsDeal.com is a leading supplier of genuine Subaru parts and accessories. With over a decade of industry experience, we provide OEM parts directly shipped by authorized Subaru dealers. Our easy-to-use parts catalog and large inventory, including rare components, help ensure correct fitment and performance. Customers are satisfied due to our fast shipping of regional based dealers and straightforward return policy. Our quality is reflected in our competitive prices as well as the manufacturer's warranty provided by Subaru. Why wait? Shop SubaruPartsDeal.com!

Why choose Subaru Parts Deal

  • Dedicated Service

    Your complete satisfaction is our #1 goal

  • Lowest Prices

    Best deals on genuine OE parts from dealerships

  • Fast Delivery

    Orders are processed and delivered promptly