×
- Hello
- Login or Register
- Quick Links
- Live Chat
- Track Order
- Parts Availability
- RMA
- Help Center
- Contact Us
- Shop for
- Subaru Parts
- Subaru Accessories


My Garage
My Account
Cart
Additional information needed to check if this part fits
2013 Subaru Forester
Check another vehicle- Production Date: 201203 - 201211
- Fitting Vehicle Options: 25B
Subaru 12033AC250 Piston Ring Set
2011-2014 Subaru 12033AC250
Customer Questions & Expert Answers (1)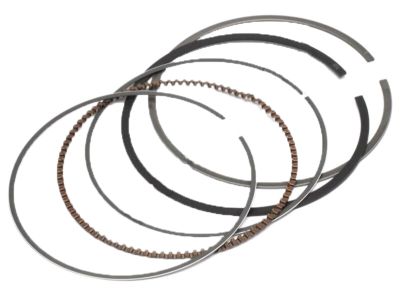
- Part DescriptionPiston Ring Set
- OS 0.25
- Part Code12033
- Replaced By
- ManufacturerSubaru
Additional information needed to check if this part fits
2013 Subaru Forester
Check another vehicle- Production Date: 201203 - 201211
- Fitting Vehicle Options: 25B
$141.26 MSRP: $206.52
You Save: $65.26 (32%)
Ships in 1-3 Business Days
1
- Related Parts
- Specifications
- Q&A
Product Specifications
Brand Genuine Subaru Part Code 12033 Manufacturer Part Number 12033AC250 Part Description Piston Ring Set Manufacturer Note OS 0.25 Item Weight 1.30 Pounds Condition New Fitment Type Direct Replacement Manufacturer Subaru SKU 12033AC250 Warranty This genuine Subaru part is guaranteed by Subaru's factory warranty. Shipping & Return Shipping Policy Return Policy Warning: California's Proposition 65Customer Questions & Expert Answers
- Q:How to remove and install the Piston Ring Set on Subaru Forester? Posted by Customer
- A:Removal steps 1. Work in a clean, well-ventilated area, wear eye/hand protection, and disconnect the negative battery cable to prevent electrical faults. 2. Drain engine oil and coolant to avoid spills when removing components that allow piston access. 3. Label and photograph electrical connectors, vacuum lines, and hoses to aid reassembly. 4. Remove the components commonly required for access (for example: intake/exhaust/valve covers, timing covers or accessories, cylinder head or oil pan) following general disassembly practices for the engine design. 5. If required for access or safety, relieve fuel system pressure and isolate fuel lines before further disassembly. 6. Rotate the crank to position pistons as recommended for service (commonly near TDC for the cylinder being worked on) per general engine-handling practice. 7. Mark connecting rods and caps to maintain correct orientation, then remove rod caps and carefully lift the pistons out of the bores from the top or push them down/out from the top or bottom as design permits. 8. Remove piston rings using a ring expander or carefully with minimal twisting to avoid damaging ring grooves or pistons. 9. Clean piston ring grooves, pistons, and bores; inspect pistons, rings, rod bearings, and cylinder walls for wear or damage and set aside parts in organized, labeled trays. 10. Replace any gaskets, seals, rod bearings, or other consumables removed during disassembly. Installation steps 1. Confirm cylinder bores and pistons are clean and undamaged; check piston-to-bore condition and verify ring end gap per the ring manufacturer's or engine manufacturer's specifications (do not guess clearance). 2. Assemble ring components in the correct order and orientation; follow markings on rings and the ring manufacturer's instructions. 3. If the design uses multi-piece oil rings, assemble oil ring rails and expander correctly before fitting to the piston. 4. Use a proper piston ring expander to fit rings onto pistons to avoid twisting or scratching; avoid prying rings over pistons with screwdrivers. 5. Lightly lubricate rings and cylinder walls with clean engine oil before installation. 6. Stagger ring end gaps around the piston circumference so they are not aligned, following general best practice for gap placement. 7. Use an appropriate ring compressor sized to the piston and bore, compress the rings squarely, and carefully guide the piston into the bore without cocking or forcing. 8. Reinstall connecting rod caps in their original orientation and sequence; use new bearings if removed and follow manufacturer procedures for bearing installation. 9. Reassemble removed components (oil pan, cylinder head, valve covers, intake/exhaust components, timing covers, accessories) replacing seals and gaskets as needed and reconnect labeled wiring and hoses. 10. Refill engine oil and coolant to proper levels and reconnect the negative battery cable. 11. Crank the engine and inspect for abnormal noises, leaks, or loss of oil pressure; monitor for any unusual behavior. 12. Follow the piston ring or engine builder's recommended break-in procedure (use proper oil, avoid heavy loads or high rpm until rings seat) and recheck oil level and for leaks after initial run-in. Repair tip: Keep parts organized and numbered (cylinder and rod numbers) so each piston and cap go back to their original bore and orientation.Generated by AI Expert
- Q:
Why choose Subaru Parts Deal
- Dedicated Service
Your complete satisfaction is our #1 goal
- Lowest Prices
Best deals on genuine OE parts from dealerships
- Fast Delivery
Orders are processed and delivered promptly