×
- Hello
- Login or Register
- Quick Links
- Live Chat
- Track Order
- Parts Availability
- RMA
- Help Center
- Contact Us
- Shop for
- Subaru Parts
- Subaru Accessories
My Garage
My Account
Cart
Genuine Subaru Forester Sway Bar Link
Stabilizer Sway Bar Link- Select Vehicle by Model
- Select Vehicle by VIN
Select Vehicle by Model
orMake
Model
Year
Select Vehicle by VIN
For the most accurate results, select vehicle by your VIN (Vehicle Identification Number).
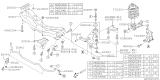
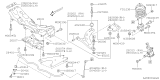
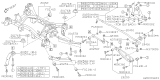
14 Sway Bar Links found


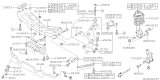
Subaru Forester Link Assembly Front STABILIZER
Part Number: 20420XA000$44.09 MSRP: $63.90You Save: $19.81 (31%)Ships in 1-3 Business Days


Subaru Forester Stabilizer Link
Part Number: 20470SA001$38.15 MSRP: $55.28You Save: $17.13 (31%)Ships in 1-3 Business Days


Subaru Forester Link Assembly STABILIZER Front
Part Number: 20420FL020$35.81 MSRP: $51.90You Save: $16.09 (31%)Ships in 1-2 Business Days


Subaru Forester Link Assembly STABILIZER Front
Part Number: 20420FL030$35.81 MSRP: $51.90You Save: $16.09 (31%)Ships in 1-3 Business Days


Subaru Forester STABILIZER Lk Rear
Part Number: 20470AJ010$43.65 MSRP: $63.27You Save: $19.62 (32%)Ships in 1-2 Business Days


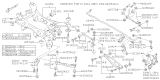
Subaru Forester Link Assembly STABILIZER Rear Rear
Part Number: 20470FL000$44.74 MSRP: $64.83You Save: $20.09 (31%)Ships in 1-3 Business Days


Subaru Forester Link Assembly Front STABILIZER
Part Number: 20470SA000$38.15 MSRP: $55.28You Save: $17.13 (31%)Ships in 1-3 Business Days


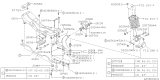
Subaru Forester STABILIZER Link Assembly Front
Part Number: 20420AA004$43.46 MSRP: $62.98You Save: $19.52 (31%)Ships in 1-2 Business Days


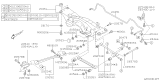
Subaru Forester Link Assembly STABILIZER Rear
Part Number: 20470SA011$29.49 MSRP: $42.73You Save: $13.24 (31%)Ships in 1-3 Business Days


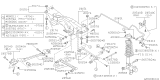
Subaru Forester STABILIZER Link Assembly Rear
Part Number: 20481AA001$76.36 MSRP: $110.67You Save: $34.31 (31%)Ships in 1 Business Day


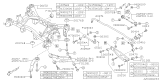
Subaru Forester Link Assembly STABILIZER Rear
Part Number: 20470SC000$43.65 MSRP: $63.27You Save: $19.62 (32%)Ships in 1-3 Business Days


Subaru Forester STABILIZER Link Assembly Front
Part Number: 20420AA003$43.46 MSRP: $62.98You Save: $19.52 (31%)Ships in 1-2 Business Days
Subaru Forester Link Assembly STABILIZER Rear L
Part Number: 20470FL010$44.74 MSRP: $64.83You Save: $20.09 (31%)Ships in 1-3 Business Days
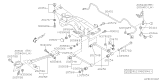
Subaru Forester Link Assembly STABILIZER Rear
Part Number: 20470SA010$29.49 MSRP: $42.73You Save: $13.24 (31%)Ships in 1-3 Business Days
Subaru Forester Sway Bar Link
Our website stands as the go-to online destination for OEM Subaru Forester Sway Bar Link. With complete lines of genuine Subaru Forester Sway Bar Link available at unbeatable market prices, we ensure top quality, reliability, and durability. Each part comes backed by the manufacturer's warranty, reinforcing your trust in our offerings.
Subaru Forester Sway Bar Link Parts Questions & Experts Answers
- Q: How to Install a Sway Bar Kit and Sway Bar Link on a Subaru Forester?A:New 'self-locking' mounting nuts should be used when fitting the sway bar links as recommended by the manufacturer. First, free the wheel lug nuts then block the rear wheels, lift the front part of the motor vehicle and place it securely on jack stands then remove the front wheels. Subsequently, if there is one, remove the nuts of the links connecting the sway bar kit to the Control Arms, and then remove the fasteners of the clips of the sway bar bushing. For late model link designs, loosen the nut with an Allen head screw that is placed at the end of the link's ballstud. Next take off the sway bar bushing clamps and the sway bar kit for additional information of the repair procedure. Go further to unbolt the bushings from the sway bar kit and perform crack, deterioration or general ageing check on the bushing and for the sway bar kit, check the curved parts likewise the deformation and replace parts where necessary. There is a tradition of installing systems in reverse order to the removal process with specific effort being applied to the fasteners to bring them to the correct torque. Last, fix the wheels and lug nuts, drop the car, and tighten the lug nuts to the recommended pound-force.

Related Subaru Forester Parts
 Subaru Forester Steering Wheel
 Subaru Forester Control Arm
 Subaru Forester Sway Bar Bushing
 Subaru Forester Sway Bar Kit
 Subaru Forester Sway Bar Bracket
Browse by Year
2025 Sway Bar Link 2024 Sway Bar Link 2023 Sway Bar Link 2022 Sway Bar Link 2021 Sway Bar Link 2020 Sway Bar Link 2019 Sway Bar Link 2018 Sway Bar Link 2017 Sway Bar Link 2016 Sway Bar Link 2015 Sway Bar Link 2014 Sway Bar Link 2013 Sway Bar Link 2012 Sway Bar Link 2011 Sway Bar Link 2010 Sway Bar Link 2009 Sway Bar Link 2008 Sway Bar Link 2007 Sway Bar Link 2006 Sway Bar Link 2005 Sway Bar Link 2004 Sway Bar Link 2003 Sway Bar Link 2002 Sway Bar Link 2001 Sway Bar Link 2000 Sway Bar Link 1999 Sway Bar Link 1998 Sway Bar Link