×
- Hello
- Login or Register
- Quick Links
- Live Chat
- Track Order
- Parts Availability
- RMA
- Help Center
- Contact Us
- Shop for
- Subaru Parts
- Subaru Accessories
My Garage
My Account
Cart
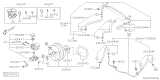
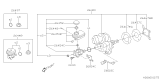
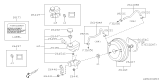
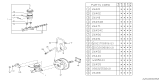
Genuine Subaru Legacy Brake Master Cylinder
- Select Vehicle by Model
- Select Vehicle by VIN
Select Vehicle by Model
orMake
Model
Year
Select Vehicle by VIN
For the most accurate results, select vehicle by your VIN (Vehicle Identification Number).
38 Brake Master Cylinders found


Subaru Legacy Master Cylinder Assembly (VDC)
Part Number: 26401AJ000$168.65 MSRP: $246.57You Save: $77.92 (32%)Ships in 1-2 Business Days


Subaru Legacy Master Cylinder Assembly (VDC)
Part Number: 26401AG030$165.63 MSRP: $242.15You Save: $76.52 (32%)Ships in 1-3 Business Days

Subaru Legacy Master Cylinder Assembly
Part Number: 26401AE03A$326.57 MSRP: $481.67You Save: $155.10 (33%)Ships in 1-3 Business Days
Subaru Legacy Ma Cylinder Assembly (VDC)LH
Part Number: 26401AJ001$168.65 MSRP: $246.57You Save: $77.92 (32%)Ships in 1-3 Business Days

Subaru Legacy Master Cylinder Assembly
Part Number: 26401AC220$326.57 MSRP: $481.67You Save: $155.10 (33%)Ships in 1-3 Business Days


Subaru Legacy Master Cylinder Assembly (Abs)
Part Number: 26401AG010$146.41 MSRP: $214.05You Save: $67.64 (32%)
Subaru Legacy Master Cylinder Kit
Part Number: 26449AL03A$153.98 MSRP: $225.12You Save: $71.14 (32%)Ships in 1-3 Business DaysSubaru Legacy Master Cylinder Assembly
Part Number: 26401AC120$175.35 MSRP: $256.37You Save: $81.02 (32%)Ships in 1-3 Business DaysSubaru Legacy Master Cylinder Assembly
Part Number: 26401AA241$125.33 MSRP: $181.63You Save: $56.30 (31%)Ships in 1-3 Business Days
Subaru Legacy Master Cylinder Kit
Part Number: 26449AN04A$145.86 MSRP: $213.25You Save: $67.39 (32%)Ships in 1-3 Business Days
Subaru Legacy WVY35 Master Cylinder Kit
Part Number: 26449FJ011$181.07 MSRP: $264.72You Save: $83.65 (32%)Ships in 1-3 Business DaysSubaru Legacy MA CYL KIT LHD
Part Number: 26449AN07B$145.86 MSRP: $213.25You Save: $67.39 (32%)Ships in 1-2 Business Days
Subaru Legacy Master Cylinder Assembly
Part Number: 26401AA401$152.70 MSRP: $223.25You Save: $70.55 (32%)Ships in 1-3 Business DaysSubaru Legacy Master Cylinder Assembly
Part Number: 26401AA400$152.70 MSRP: $223.25You Save: $70.55 (32%)Ships in 1-3 Business DaysSubaru Legacy Master Cylinder Assembly
Part Number: 26401AC200$175.35 MSRP: $256.37You Save: $81.02 (32%)Ships in 1-3 Business DaysSubaru Legacy Master Cylinder Assembly
Part Number: 26401AJ020$168.65 MSRP: $246.57You Save: $77.92 (32%)


| Page 1 of 2 |Next >
1-20 of 38 Results
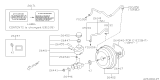
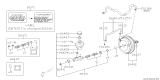
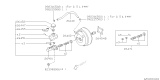
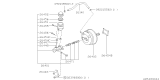
Subaru Legacy Brake Master Cylinder
Subaru Legacy Brake Master Cylinder is one of the significant aspects of the braking system and widely appreciated due to its durability, consistency and apt working for the different models of Subaru Legacy. This critical part transmits force through hydraulic means by converting the pressure applied by the driver's foot into hydraulic pressure, which in turn forces brake fluid to flow through the system to the slave cylinders, which turns on the brakes. Other components fitted to Subaru Legacy are dual circuit Brake Master Cylinders with extra levels of protection in case one circuit is lost, the other is able to sustain braking pressure. This design not only adds value to the efficiency of the car but also plays a major role in the safety of the car. The Subaru Legacy model has been manufactured starting 1989 till 2020 and all the models have come with sophisticated braking equipment, to include 4-channel ABS to boost on performance and safety. The construction of the Brake Master Cylinder, furthermore its hydraulic structure, is prominent for steering and halting, so it is considered significant in the automotive marketplace. Maintenance of the Subaru Legacy Brake Master Cylinder should be frequently done to avoid cases where there could be leakage of the fluid or other internal problems which are fatal to the vehicle braking system. Subaru has demonstrated a great deal of commitment in delivering only the optimal Brake Master Cylinder, thus the Subaru Legacy Brake Master Cylinder is one of the optimal given its effectiveness, added features and reliability thereby making Subaru Legacy one of the optimal cars for a safe and effective drive. The importance of the Brake Master Cylinder cannot be overstated, as it is essential for the overall performance and safety of the vehicle.
Our website stands as the go-to online destination for OEM Subaru Legacy Brake Master Cylinder. With complete lines of genuine Subaru Legacy Brake Master Cylinder available at unbeatable market prices, we ensure top quality, reliability, and durability. Each part comes backed by the manufacturer's warranty, reinforcing your trust in our offerings.
Subaru Legacy Brake Master Cylinder Parts Questions & Experts Answers
- Q: How to remove and install a Brake Master Cylinder on a Subaru Legacy?A:Place shop rags underneath the brake master cylinder to catch any spilled brake fluid, then remove the brake fluid from the reservoir. Unplug the electrical connector for the brake fluid level indicator. Place rags or newspapers under the brake line fillings. Using a flare-nut wrench, unscrew the brake line tube nuts and allow any residual fluid to drain onto the rags. Remove the nuts that attach the brake master cylinder to the power Brake Booster. Remove the brake master cylinder from the engine compartment, being careful not to spill any fluid. If a new brake master cylinder is being installed, check and adjust the booster pushrod length. Bench bleed the new brake master cylinder before installing it. Attach a pair of brake master cylinder bleeder tubes to the outlet ports of the brake master cylinder. Fill the reservoir with brake fluid. Slowly push the pistons into the brake master cylinder to expel air. Repeat the procedure until no more air bubbles are present. Remove the bleed tubes and install plugs in the open ports. Replace the O-ring seal on the brake master cylinder (if equipped) and then place it over the studs on the booster and tighten the attaching nuts only finger tight at this time. Thread the brake line fittings into the brake master cylinder. Fully tighten the mounting nuts, then the brake line fittings. Fill the brake master cylinder reservoir with fluid, then bleed the brake master cylinder and the brake system. The remainder of installation is the reverse of removal. Test the operation of the brake system carefully before placing the vehicle into normal service.
")
Related Subaru Legacy Parts

Browse by Year
2025 Brake Master Cylinder 2024 Brake Master Cylinder 2023 Brake Master Cylinder 2022 Brake Master Cylinder 2021 Brake Master Cylinder 2020 Brake Master Cylinder 2019 Brake Master Cylinder 2018 Brake Master Cylinder 2017 Brake Master Cylinder 2016 Brake Master Cylinder 2015 Brake Master Cylinder 2014 Brake Master Cylinder 2013 Brake Master Cylinder 2012 Brake Master Cylinder 2011 Brake Master Cylinder 2010 Brake Master Cylinder 2009 Brake Master Cylinder 2008 Brake Master Cylinder 2007 Brake Master Cylinder 2006 Brake Master Cylinder 2005 Brake Master Cylinder 2004 Brake Master Cylinder 2003 Brake Master Cylinder 2002 Brake Master Cylinder 2001 Brake Master Cylinder 2000 Brake Master Cylinder 1999 Brake Master Cylinder 1998 Brake Master Cylinder 1997 Brake Master Cylinder 1996 Brake Master Cylinder 1995 Brake Master Cylinder 1994 Brake Master Cylinder 1993 Brake Master Cylinder 1992 Brake Master Cylinder 1991 Brake Master Cylinder 1990 Brake Master Cylinder