×
- Hello
- Login or Register
- Quick Links
- Live Chat
- Track Order
- Parts Availability
- RMA
- Help Center
- Contact Us
- Shop for
- Subaru Parts
- Subaru Accessories
My Garage
My Account
Cart
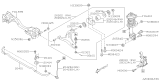
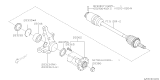
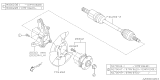
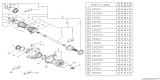
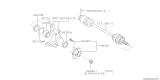
Genuine Subaru Legacy Steering Knuckle
Front Steering Knuckle- Select Vehicle by Model
- Select Vehicle by VIN
Select Vehicle by Model
orMake
Model
Year
Select Vehicle by VIN
For the most accurate results, select vehicle by your VIN (Vehicle Identification Number).
32 Steering Knuckles found


Subaru Legacy Front Spindle Knuckle Left Hand
Part Number: 28313AL01B$593.43 MSRP: $875.27You Save: $281.84 (33%)Ships in 1-3 Business Days


Subaru Legacy Front Spindle Knuckle, Right
Part Number: 28313AE020$435.07 MSRP: $641.70You Save: $206.63 (33%)Ships in 1-3 Business Days


Subaru Legacy Front Spindle Knuckle Left Hand
Part Number: 28313AE030$435.07 MSRP: $641.70You Save: $206.63 (33%)Ships in 1-3 Business Days
Subaru Legacy Front Spindle Knuckle, Right
Part Number: 28313AL00A$593.43 MSRP: $875.27You Save: $281.84 (33%)


Subaru Legacy Front Spindle Knuckle Left Hand
Part Number: 28313AG01A$176.85 MSRP: $258.55You Save: $81.70 (32%)Ships in 1-2 Business Days

Subaru Legacy Front Spindle Knuckle Left Hand
Part Number: 28313AL01A$593.43 MSRP: $875.27You Save: $281.84 (33%)Ships in 1-2 Business Days


Subaru Legacy Front Spindle Knuckle, Right
Part Number: 28313AG00A$176.85 MSRP: $258.55You Save: $81.70 (32%)Ships in 1-2 Business Days
Subaru Legacy Front Spindle Knuckle Left Hand
Part Number: 28313AG03B$176.85 MSRP: $258.55You Save: $81.70 (32%)Ships in 1-2 Business Days


Subaru Legacy Front Spindle Knuckle, Right
Part Number: 28313AG02A$176.85 MSRP: $258.55You Save: $81.70 (32%)Ships in 1 Business Day
Subaru Legacy Front Spindle Knuckle Left Hand
Part Number: 28313AG03A$176.85 MSRP: $258.55You Save: $81.70 (32%)Ships in 1 Business Day


Subaru Legacy Front Spindle Knuckle Right
Part Number: 28313AG02B$176.85 MSRP: $258.55You Save: $81.70 (32%)Ships in 1 Business Day

Subaru Legacy Front Spindle Knuckle Left Hand
Part Number: 28012AA012$210.68 MSRP: $308.02You Save: $97.34 (32%)Ships in 1-3 Business Days

Subaru Legacy Front Spindle Knuckle Left Hand
Part Number: 28313AE01A$435.07 MSRP: $641.70You Save: $206.63 (33%)Ships in 1-3 Business DaysSubaru Legacy Front Spindle Steering Knuckle Right
Part Number: 28313AL00B$593.43 MSRP: $875.27You Save: $281.84 (33%)
Subaru Legacy Front Spindle Knuckle Left Hand
Part Number: 28313AN03A$134.63 MSRP: $195.12You Save: $60.49 (31%)Ships in 1-2 Business Days
Subaru Legacy Front Spindle Knuckle Right
Part Number: 28313AN00A$135.70 MSRP: $196.67You Save: $60.97 (31%)Ships in 1-3 Business DaysSubaru Legacy Front Spindle Knuckle Right
Part Number: 28313AN02A$134.63 MSRP: $195.12You Save: $60.49 (31%)Ships in 1-2 Business DaysSubaru Legacy Front Spindle Knuckle Left Hand
Part Number: 28313AN01A$135.70 MSRP: $196.67You Save: $60.97 (31%)Ships in 1-2 Business DaysSubaru Legacy Front Spindle Knuckle Left Hand
Part Number: 28012AA032$210.68 MSRP: $308.02You Save: $97.34 (32%)Ships in 1-3 Business Days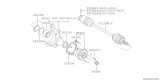
Subaru Legacy Front Spindle Knuckle Left Hand
Part Number: 28012AA013$210.68 MSRP: $308.02You Save: $97.34 (32%)Ships in 1-3 Business Days
| Page 1 of 2 |Next >
1-20 of 32 Results
Subaru Legacy Steering Knuckle
Our website stands as the go-to online destination for OEM Subaru Legacy Steering Knuckle. With complete lines of genuine Subaru Legacy Steering Knuckle available at unbeatable market prices, we ensure top quality, reliability, and durability. Each part comes backed by the manufacturer's warranty, reinforcing your trust in our offerings.
Subaru Legacy Steering Knuckle Parts Questions & Experts Answers
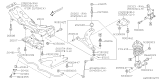
- Q: How to install front steering knuckle on Subaru Legacy?A:The manufacturer recommends using new self-locking mounting nuts when installing the strut assembly to the steering knuckle. Begin by unstaking and loosening the driveaxle nut. Loosen the wheel lug nuts, block the rear wheels, raise the front of the vehicle, and place it securely on jackstands before removing the front wheel. Next, remove the brake caliper, the caliper support bracket, and the brake disc. For models with ABS, remove the front wheel speed sensor and secure it aside. Disconnect the tie-rod end from the steering knuckle and loosen, but do not remove, the strut-to-steering knuckle nuts, ensuring to mark the relationship of the upper bolt to the strut flange to preserve the camber angle during reassembly. Separate the Control Arm from the steering knuckle, then remove the strut-to-knuckle nuts and bolts. Remove the driveaxle nut and pull the steering knuckle off the outer CV joint; if the hub sticks to the CV joint splines, use a two-jaw puller to push the stub shaft out of the hub. Exercise caution not to overextend the inner CV joint. While the steering knuckle is removed, a qualified repair facility can replace the front wheel bearings if necessary, and any damaged CV joint boots should also be replaced at this time. Inspect and, if necessary, replace the control arm balljoint while the suspension is disassembled. Installation is the reverse of removal, ensuring to align the mark on the upper strut-to-knuckle bolt with the mark on the strut flange, and tighten all fasteners to the specified torque. Finally, install the wheel and lug nuts, lower the vehicle, tighten the lug nuts to the specified torque, and have the front end alignment checked and adjusted if necessary.

Related Subaru Legacy Parts

Browse by Year
2025 Steering Knuckle 2024 Steering Knuckle 2023 Steering Knuckle 2022 Steering Knuckle 2021 Steering Knuckle 2020 Steering Knuckle 2019 Steering Knuckle 2018 Steering Knuckle 2017 Steering Knuckle 2016 Steering Knuckle 2015 Steering Knuckle 2014 Steering Knuckle 2013 Steering Knuckle 2012 Steering Knuckle 2011 Steering Knuckle 2010 Steering Knuckle 2009 Steering Knuckle 2008 Steering Knuckle 2007 Steering Knuckle 2006 Steering Knuckle 2005 Steering Knuckle 2004 Steering Knuckle 2003 Steering Knuckle 2002 Steering Knuckle 2001 Steering Knuckle 2000 Steering Knuckle 1999 Steering Knuckle 1998 Steering Knuckle 1997 Steering Knuckle 1996 Steering Knuckle 1995 Steering Knuckle 1994 Steering Knuckle 1993 Steering Knuckle 1992 Steering Knuckle 1991 Steering Knuckle 1990 Steering Knuckle