×
- Hello
- Login or Register
- Quick Links
- Live Chat
- Track Order
- Parts Availability
- RMA
- Help Center
- Contact Us
- Shop for
- Subaru Parts
- Subaru Accessories
My Garage
My Account
Cart
Genuine Subaru Legacy Crankshaft Seal
- Select Vehicle by Model
- Select Vehicle by VIN
Select Vehicle by Model
orMake
Model
Year
Select Vehicle by VIN
For the most accurate results, select vehicle by your VIN (Vehicle Identification Number).
2 Crankshaft Seals found


Subaru Legacy Oil Seal
Part Number: 806733030$9.58 MSRP: $13.53You Save: $3.95 (30%)Ships in 1-3 Business Days


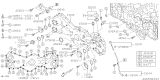
Subaru Legacy Front Oil Seal
Part Number: 806750080$11.65 MSRP: $16.45You Save: $4.80 (30%)Ships in 1-3 Business Days
Subaru Legacy Crankshaft Seal
Our website stands as the go-to online destination for OEM Subaru Legacy Crankshaft Seal. With complete lines of genuine Subaru Legacy Crankshaft Seal available at unbeatable market prices, we ensure top quality, reliability, and durability. Each part comes backed by the manufacturer's warranty, reinforcing your trust in our offerings.
Subaru Legacy Crankshaft Seal Parts Questions & Experts Answers
- Q: How to remove and install a front crankshaft seal on Subaru Legacy?A:Next, unfasten the cable amongst the negative terminal of the battery. Further, the Timing Belt and crankshaft sprocket must be taken off. Gently loosen the seal from the cover using any of the following tools: seal puller or large screw driver, while trying to base it on some specific rules of bearing mind that if the area where the seal fits is scratched, gouged, or distorted it will lead to formation of an oil leak. Another way is to drill two 1/8-inch holes in the seal, taking the utmost care not to harm the seal housing or the crankshaft; then to screw two self-tapping screws into the holes and pull them with a slide hammer or self-locking pliers, going from side to side. Reduce the inner diameter of the bore to remove the old seal material and oxidation and place the new seal before the side with the lip faces the engine. It is recommended to coat this new seal with a small amount of oil at the outer radius to help installation, although it should not be too much oil. Using again a large socket and hammer, drive the seal into the bore of the shaft until it is seated correctly, that is from the outer face of the seal to the inner face until the seal comes into contact with the cover flange just as the previous seal. The rest of the process corresponds to the cleanness step by step and in the opposite order to the removal procedure.

Related Subaru Legacy Parts
 Subaru Legacy Oil Filter
 Subaru Legacy Crankshaft
 Subaru Legacy Oil Pump
 Subaru Legacy Crankshaft Pulley
 Subaru Legacy Oil Pressure Sensor
 Subaru Legacy Piston Ring Set
 Subaru Legacy Crankcase Breather Hose
 Subaru Legacy Crankshaft Gear
 Subaru Legacy Crankshaft Thrust Washer Set
 Subaru Legacy Oil Filter Housing
Browse by Year
2019 Crankshaft Seal 2018 Crankshaft Seal 2017 Crankshaft Seal 2016 Crankshaft Seal 2015 Crankshaft Seal 2014 Crankshaft Seal 2013 Crankshaft Seal 2012 Crankshaft Seal 2011 Crankshaft Seal 2010 Crankshaft Seal 2009 Crankshaft Seal 2008 Crankshaft Seal 2007 Crankshaft Seal 2006 Crankshaft Seal 2005 Crankshaft Seal 2004 Crankshaft Seal 2003 Crankshaft Seal 2002 Crankshaft Seal 2001 Crankshaft Seal 2000 Crankshaft Seal